Creating a Crypto Tax Report with Syla
Who is Syla?
Syla is a crypto tax calculator designed by Australian tax professionals to help you pay the lowest tax, with affordable plans for up to 100,000 transactions and support for individual, company, trust, and SMSF accounts.
Steps:
- Generate your API key from your Wealth99 account
- Register an account at https://www.syla.com.au
- Search for and select Wealth99 as your first data source.
- Enter your API Key and Secret into Syla and click sync.
Sign up at Syla and use the code SAVEWEALTH to get 30% OFF.
What’s in this article?
- How to register for an account on Syla.
- How to connect your Wealth99 account via API with Syla (recommended).
- Exporting CSV Files for Upload to Syla
How to register for an account on Syla
You’ll need to first register an account on Syla and then add Wealth99 as a data source.
1. Go to Syla and click Sign Up to register an account.

2. Start typing “Wealth99”(1) in the search bar.
3. Then select the Wealth99 (2) data source.

4. You can choose to either import your Wealth99 data using an API Sync (recommended) or by uploading your CSV files with a File Import.

How to connect your Wealth99 account via API with Syla (recommended)
This is the simplest and most comprehensive way to import your Wealth99 data into Syla.
1. Start by logging in to your Wealth99 account.
2. Go to 'Account' on the left side menu, and select the 'Financial' tab.
3. Navigate to the 'API Keys' section and click on 'Generate API Key'.

4. Insert 'Syla' as the API Key name and click 'Continue'.
5. The Google Authenticator code will be required. Insert the six-digit code from the authenticator app to proceed. (If the 2FA wasn't activated through Google Authenticator, you'll receive a six-digit code via SMS.)
6. Copy the provided API Key and Secret and paste them into Syla. Save these credentials in a safe place.

7. Click 'Complete'.
8. In Syla, click 'Secure Sync'.
Exporting CSV Files for Upload to Syla
It’s easy to export your All Transactions History CSV from your Wealth99 account and import it into Syla:
1. Log in to Wealth99 and go to the 'History' tab.
2. Click 'Export'.

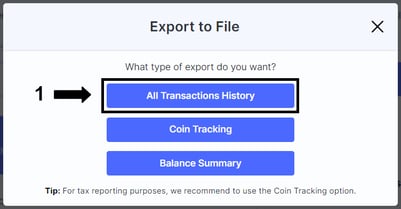
3. Click 'All Transactions History'.

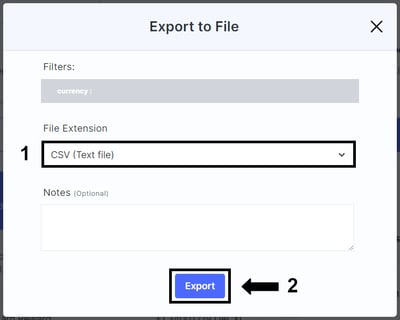
4. For File Extension select 'CSV (Text file)', and click 'Export'.

5. Wait for the export to finish processing, then navigate to the 'File Exports' tab and click 'Download'.

6. In Syla, upload your All Transactions History CSV to your Wealth99 data source and click 'Secure Import'.
Further instructions and support can be found on Syla.
Disclaimer: Syla is not a Wealth99 service. If you decide to use Syla, you are responsible for reviewing the third party’s service terms, website terms, and privacy policies. You agree that third parties, and not Wealth99, are responsible for the performance of Syla and the content on their website. Links to third-party websites will open new browser windows. Except where noted, Wealth99 accepts no responsibility for content on third-party websites.
